How to Replace a Furnace Filter: A Simple Guide
Performing DIY repairs on any large appliance, especially a furnace, can be intimidating. Thankfully, one of the most common furnace maintenance projects can be done with no specialized knowledge.
Learning how to replace a furnace filter should be part of every homeowner’s skill set. If you aren’t sure where to start, read on to find out how to know it’s time for a replacement and how to install a filter.

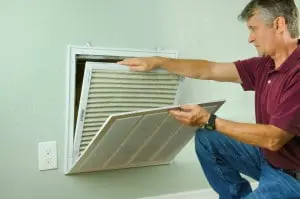
A professional repair service man or DIY homeowner removes a dirty air filter on a house air conditioner to replace it with a new clean one.
How Do You Know It’s Time to Change a Furnace Filter?
Many people leave the same filter in their furnace for months (or years) at a time. It’s an easy thing to forget, but filters should be changed out every 30-60 days to keep your heating system working at its best. The exact amount of time will change depending on your home’s existing air quality, whether you have pets, and if anyone in your family has breathing issues.
Single-use paper and fiberglass filters should be white and free of buildup or debris. If you notice that the filter is gray and dirty, don’t just shake off the dust and put it back. It’s time to replace it altogether.
If you have a permanent or reusable filter, you can still follow the steps below. The only difference is that instead of replacing it with a new one, you’ll clean it out with a water sprayer and let it dry off before putting it back in.
How to Replace a Furnace Filter
How long has it been since your filter was replaced? If it has been more than a few months (or you aren’t sure if it has ever been replaced), it’s time to open up your furnace and take a look at what’s inside.
1. Turn off the Furnace
Before opening up any appliance for maintenance, the first step is always to turn it off. Even though the danger of electrocution is small, you could burn yourself if the furnace has been running. There’s also a chance that the system could kick on while the filter is out and send debris circulating through the rest of your HVAC system.
Shut down your heating system by setting your thermostat to “off” and disconnecting power from the furnace. If it’s hot, wait for it to cool down before opening it up.
2. Open the Filter Compartment
Your furnace should have a marked service panel on one side. If you aren’t sure where to look, check the manual or look up your furnace model online. For old furnaces that don’t have manuals, look around the ductwork and blower compartment for a small door panel.
3. Remove and Inspect the Old Filter
Now that the service panel is open, you should be able to peek inside and see your old filter in place. Before you take it out for the first time, make a note or take a photo of how it’s installed so you can put the new one in the right way.
Pay special attention to airflow direction—you may want to mark it with an arrow on your furnace or ductwork for future reference. The arrow should point toward the fan. If you reinstall the new filter backward, its efficiency will decrease.
Take the old filter out and immediately seal it in a trash bag to keep the dust from becoming airborne. It should slide out of the furnace with little effort.
With the filter slot empty, take a moment to brush out any visible debris from inside your furnace. A large buildup of debris is a sign that it’s time to schedule a heating tune-up.
4. Purchase a Matching Replacement Filter
Check your furnace’s manual and the existing filter to make sure you buy the correct replacement. You can find furnace filters at most stores with a hardware section. Ordering them online is also simple and can give you a wider selection to choose from.
When buying a replacement, make sure you choose the correct size, material, and MERV rating for your furnace.
5. Install the New Filter
Now that you’re ready to put the new filter in, use the directions you left for yourself earlier to insert it in the right direction. Match up the airflow direction on the filter with your filter’s fan unit and slide it into place. Then, close up the service panel, and you’re ready to go.
6. Record the Date of Installation
To make sure you don’t forget to check your filter before it’s too late, write the date down for later reference. Place a sticker or magnetic notepad on or near your furnace to record the dates of your filter changes and any other furnace maintenance and repairs.
7. Restart the Furnace
Now that everything is back in place, you can reconnect the power to your furnace and turn your HVAC system back on with the thermostat. If your old filter was caked with dust before you replaced it, there might be a noticeable improvement in your home’s air quality.
Why You Should Never Ignore a Dirty or Damaged Filter
Not only can keeping your filter clean and updated extend the life of your furnace, but it will also make a huge difference in your home’s air quality.
The EPA recommends using a variety of methods to improve your indoor air quality (IAQ). Using clean filters in your furnace and HVAC unit is one of the easiest ways to trap pollutants before they enter your lungs. If your filter is damaged or caked with dust, your furnace will recirculate harmful particles back into your home’s air.
This is especially important to consider if anyone in your home has asthma or allergies or if you have dander-producing pets. Even if everyone has healthy lungs, a dusty furnace can fill your entire house with an unpleasant burning odor.
Looking for Help with Furnace Repairs in Salt Lake City, UT?
Even though you now know how to replace a furnace filter yourself, sometimes you need a professional to help you out with repairs.
When that happens, call us at Western Heating, Air & Plumbing Conditioning. We can help you with Furnace Repair Salt lake City, furnace tune-up, fix, and replace your furnace when it’s no longer working at its best. Contact us today to schedule your appointment with a 24/7 service technician.


